


A comprehensive guide to solar energy systems for damage assessment and cost estimating


This guide helps estimators and adjusters accurately assess residential solar damage. It details the differences between Photovoltaic and Thermal technologies , visual cues for identifying panel wattage , and formulas for manual system sizing. It further explains selecting specific database items for components like inverters or racking and emphasizes the specialized labor needed for safe testing and reconnection.

The core principles of solar technology
Solar panels capture energy from the sun and convert it into usable power for a building. There are two primary technologies an adjuster will encounter: Photovoltaic (PV) and Thermal.
Photovoltaic (PV) panels: generating electricity
The word "photo" means light, and "voltaic" refers to electricity. These panels use sunlight to generate direct current (DC) electricity. PV panels are made up of individual "solar cells" wired together. These cells are made of silicon, a semiconductor material. When sunlight hits the silicon, it excites electrons, knocking them loose. These loose electrons are forced to flow in a specific direction through metal conductive traces on the cell, creating an electrical current.
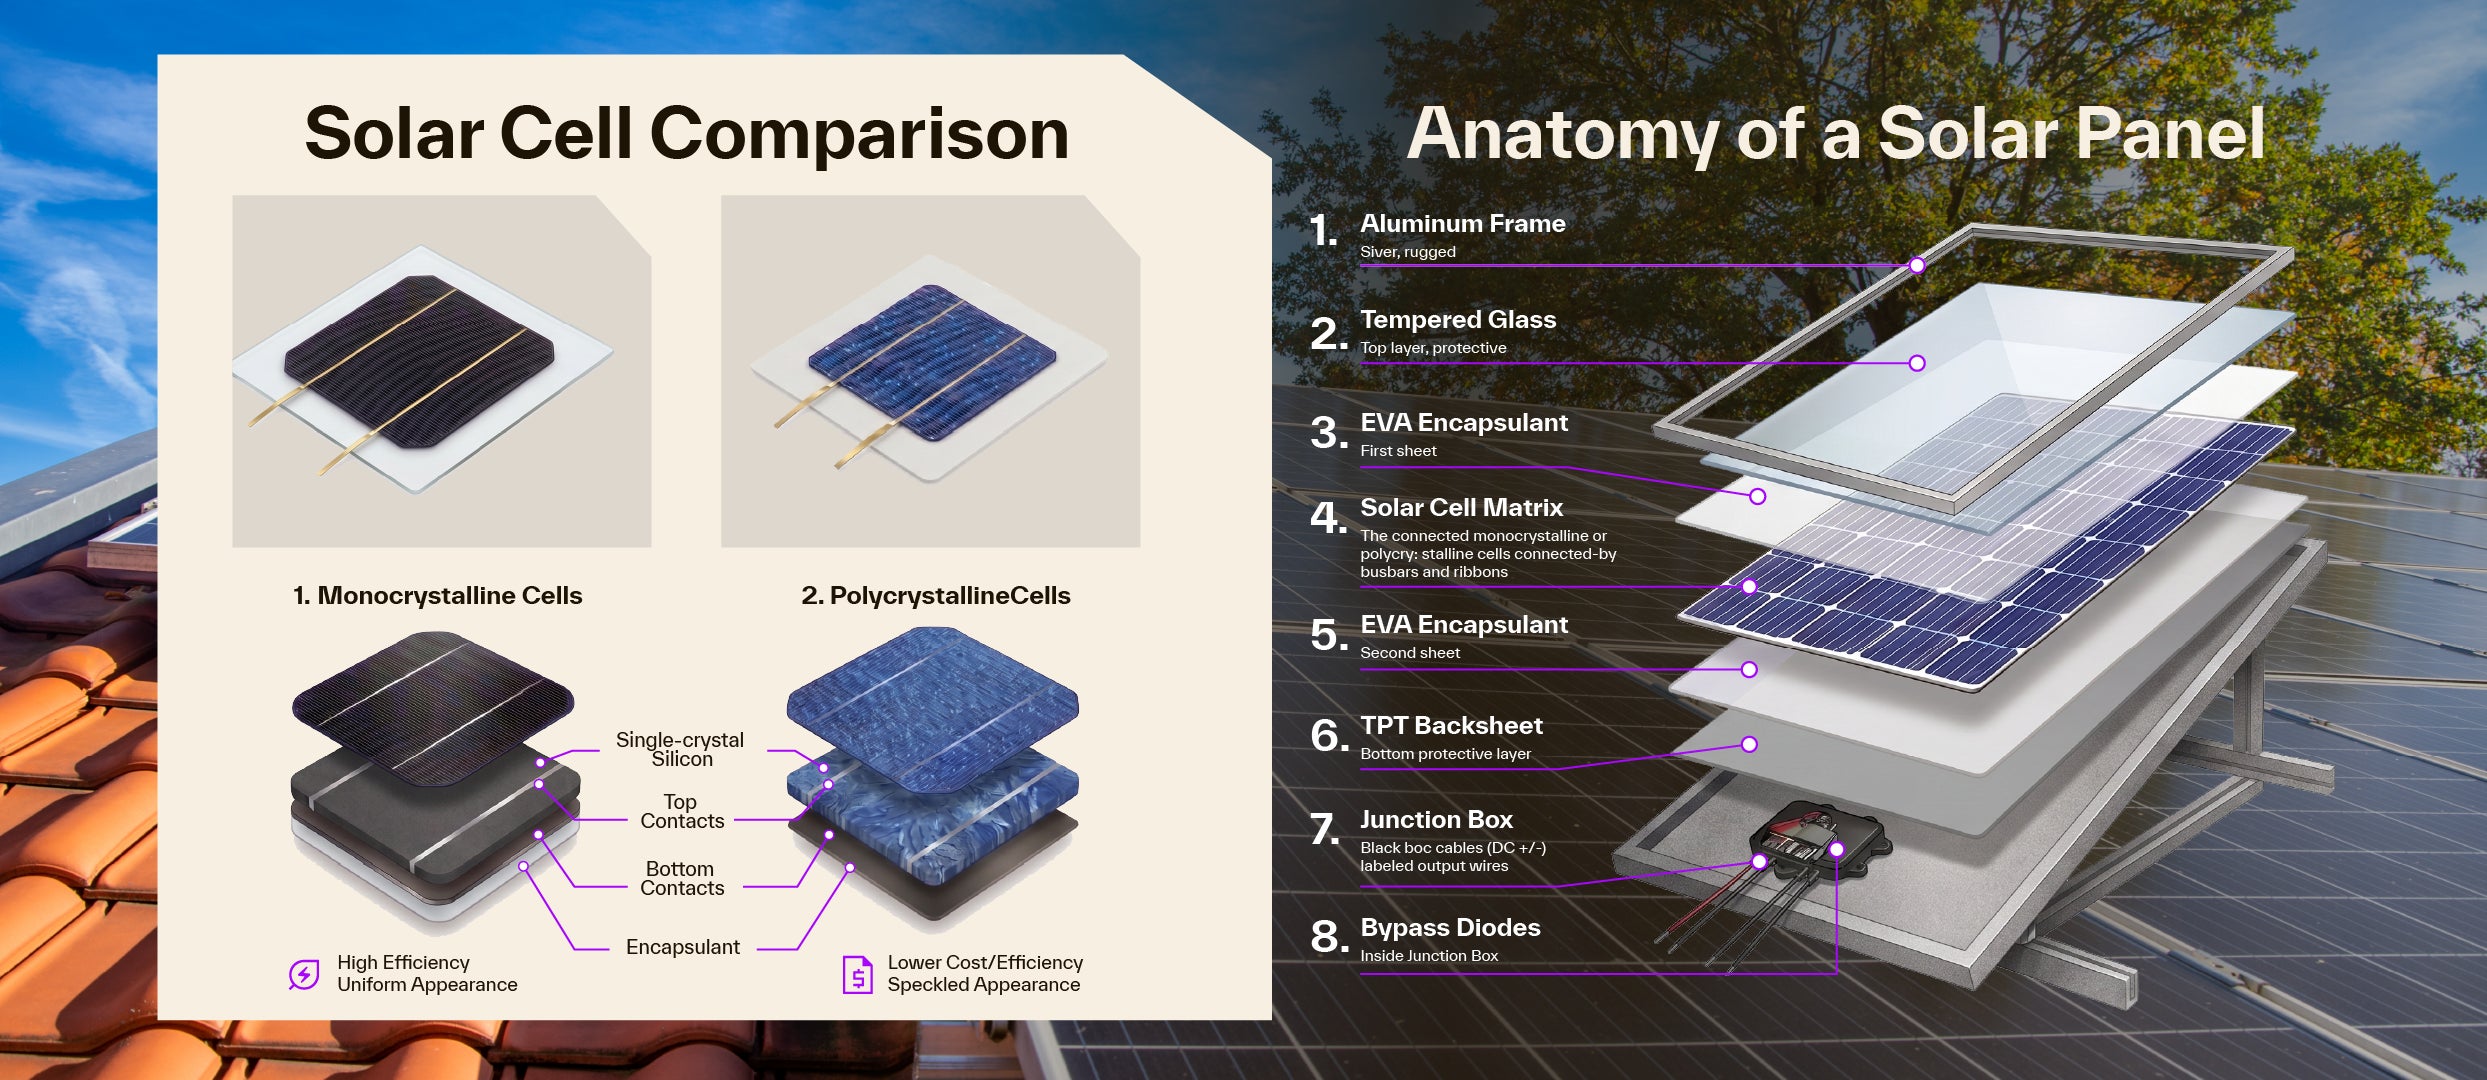
Visual cues for adjusters (types of silicon cells):
- Monocrystalline: Made from a single, pure crystal of silicon. They are highly efficient and appear solid black. If you see sleek, all-black panels on a roof, they are likely modern monocrystalline panels, which align with higher wattage database items (355 Watts and up).
- Polycrystalline: Made from melted fragments of silicon. They are slightly less efficient and have a blue, speckled, or shattered-glass appearance. These are older or budget-friendly panels, typically aligning with lower wattage database items (205-350 Watts).
The inverter's role
The DC electricity produced by the panels cannot power a house. It must be converted to alternating current (AC). This is done by an inverter.
- String inverters: One large box, usually mounted on the side of the house next to the electrical meter. All panels connect to this single box.
- Microinverters: Small individual boxes mounted directly underneath every single solar panel. If a roof has microinverters, hail that destroys a panel might also damage the microinverter beneath it.
Microinverters will cost 20-25% more than a string inverter, however this allows for individual panel power generation if some are shaded. (Makes a more efficient system.) It also gives you a 25-year warranty that generally matches the warranty on the panel. You will also have less wires coming down from the roof with a microinverter and the power will be ready to use in the house.
Thermal solar collectors: Generating heat
Instead of making electricity, thermal solar collectors capture the sun's heat. They consist of dark-colored panels or tubes that absorb sunlight and transfer that heat to a fluid (liquid or air) moving through the system.
- Liquid collectors: These heat liquid (usually water or a propylene glycol antifreeze mixture) pumped through copper pipes inside the panels. This hot liquid flows into a heat exchanger in the home to provide domestic hot water or radiant floor heating. They are typically heavier and thicker than PV panels.
- Air collectors: These operate on the same principle but heat air. Fans blow the heated air directly into the home's ductwork. They are less common than liquid systems but are used in colder, sunnier climates for supplementary space heating.
Selecting components: Deep dive into the claims database
When building an estimate, the Claims Construction Cost Database categorizes solar components based on their technology, size, and function. Here is a detailed breakdown of how to apply these database items.
Individual photovoltaic (PV) panel collectors
You will use individual panel line items when a specific number of panels are damaged (e.g., a localized tree branch impact), rather than the whole system. The database categorizes Solar Panel Collector, Photovoltaic by wattage output.
- 100-160 Watt: Typically, very small panels, often used for off-grid cabins, RVs, or older experimental residential setups.
- 205-250 Watt: The standard for residential installations between 2008 and 2015. Usually polycrystalline (blue tint).
- 305-350 Watt: The standard residential panels installed between 2016 and 2020.
- 355-400 Watt: The current standard (2020’s) for new residential installations. Usually monocrystalline (solid black).
- 405-450 Watt: High-efficiency premium residential panels. These are slightly larger physically and pack more silicon cells into the frame.
- 455-550 Watt: Very high-efficiency panels. Historically used for commercial buildings, they are now sometimes seen on large residential estates. They are significantly larger and heavier.
- Solar panel (generic): Use this line item when access is restricted, the label is destroyed, or as a temporary placeholder until a solar technician can confirm the exact specifications.
Complete photovoltaic (PV) roof-mounted systems
When a home suffers a total roof loss (like a major fire or catastrophic tornado), or if the system is destroyed, estimating panel by panel is inefficient. You will use the Solar Energy System, Photovoltaic, Roof Mounted items, which are priced by total Kilowatt (KW) size. The Claims Construction Cost database includes:
- 2 KW, 4 KW, 6 KW, 8 KW, 10 KW, and 12 KW Systems
Note: A typical American home requires an 8 KW to 10 KW system to offset its energy usage. 2 KW or 4 KW systems are usually supplemental systems or found on smaller townhomes.
Thermal solar components
Thermal systems require careful identification because they involve plumbing, not just electrical wiring.
- Solar panel collector, liquid: These individual panels are estimated by square footage (SF), because physical size dictates their heating capacity. The Claims Construction Cost database includes 20-25 SF, 26-32 SF, and 33-40 SF. A standard liquid panel is often 4 feet by 8 feet (32 SF).
- Solar package kit, liquid, SF: Use this when the entire system is destroyed. It includes the panels, the specialized circulating pump, the expansion tank, and the digital controller.
- Solar panel collector, air: Used for specialized space-heating panels.
- Pool heating panels, solar: These are distinct from domestic hot water panels. They are usually unglazed (no glass cover), made of black EPDM rubber or UV-resistant plastic, and lie directly on the roof deck. Pool water is pumped directly through them
Racking and protection
Solar panels require specialized hardware to safely attach to a roof without causing leaks.
- Solar panel, racking system, sloped roof, up to four panels: This database item encompasses the entire mounting sub-structure for a cluster of four panels. It includes standoffs, flashing, aluminum rails, and mounting clamps.
- Solar panel, critter guard, 6" and 8" (optional): The gap between the roof shingle and the bottom of the solar panel is a warm, protected environment perfect for nesting animals. Critter guard is a PVC-coated galvanized steel wire mesh installed around the perimeter.
The mathematics of system sizing and estimation
When an Estimator or Adjuster is on site, the best way to determine system size (kW generated) is to read the manufacturer's data plate on the back of the panel or the label on the main inverter box. If these are unavailable, it must be calculated manually.
Formula for total system kilowatts
To find the total system size to match against the database, calculate the total power output. Let P{total} be the total system power in Kilowatts, N be the total number of panels on the roof, and W be the estimated wattage per panel:
P{total} = N x W
Step-by-step example:
- Count the panels: You count 24 panels.
- Estimate the watts: They appear to be modern, all-black monocrystalline panels. You estimate them at 400 watts each.
- Calculation: 24 x 400 = 9600 total watts.
- Convert to kilowatts: 9600 / 1000 = 9.6 KW.
- Database selection: You would select the Solar Energy System, Photovoltaic, Roof Mounted, 10 KW system, as it is the closest standard tier.
Assessing damage and inspection workflows
Handling a solar claim is vastly different from a standard roofing claim due to high-voltage electrical components. Roofers are not electricians, and unqualified/unauthorized individuals should never attempt to move or unplug solar equipment.
- Solar panel, inspection: Dispatching a certified solar technician to physically inspect the array for shattered glass, loose torque, or chewed wires.
- Solar panel, system test: Diagnostic testing using a multimeter to find internal cell micro-fractures caused by hail that didn't shatter the glass.
- Solar panel, re-energize, calibrate and connect to grid: A comprehensive labor item covering the licensed electrician required to safely turn the system back on, calibrate the inverter, pass municipal inspection, and gain "Permission to Operate" (PTO) from the utility company after a removal and reinstallation.
Step-by-step cost analysis example: Hail claim
To illustrate how these database items work together in a real-world scenario, let's map out a hypothetical hail claim involving a residential property.
The scenario
A home is struck by a severe hailstorm (2-inch hail). The asphalt shingle roof is a total loss and must be completely replaced. The home has a 20-panel solar array (estimated at 380 watts per panel, making it roughly a 7.6 KW system). Upon visual inspection, 4 of the solar panels have shattered front glass. The racking beneath those 4 panels is bent from an accompanying wind gust. The remaining 16 panels appear visually intact but require testing. The existing critter guard was destroyed during the storm.
The scope of work strategy:
Because the roof needs replacing, the entire solar system must be temporarily Removed and Reset. This scenario does not replace the entire 8 KW system, only the specifically damaged components, plus the logistical labor to handle the array.
Note: The physical labor to Remove & Reset the 16 undamaged panels to allow for the roof replacement would utilize standard Remove and Reset Action codes within the Estimate™ software applied to the individual panel line items.
Conclusion: Synthesizing Solar Claim Estimation
Navigating residential solar energy claims requires a blend of technical knowledge and precise estimation strategies. As outlined in this guide, accurately identifying solar components and understanding their function is critical for creating a precise scope of work and cost estimate.
By mastering the core principles presented, Estimators and Adjusters can confidently handle complex solar claims. Key takeaways include:
- Identify the technology: Assess whether the system relies on Photovoltaic (PV) panels to generate electricity or thermal collectors to generate heat.
- Recognize visual cues: Use physical characteristics—such as the solid black look of highly efficient monocrystalline panels or the speckled blue appearance of polycrystalline panels—to properly align the equipment with standard wattage database items.
- Understand inverter setup: Differentiate between centralized string inverters and individual microinverters, as microinverter setups can sustain localized damage beneath the panels and carry different price points.
- Apply precise database items: Knowing when to use individual panel line items for localized impacts versus total Kilowatt (KW) system sizes for total losses is essential for estimating efficiency.
- Prioritize safety and compliance: Because roofers are not electricians, scopes of work must include certified solar technicians to safely inspect and test for hidden micro-fractures, as well as licensed electricians to re-energize, calibrate, and connect the system back to the grid.
Ultimately, utilizing a methodical approach that leverages the correct mathematical formulas, targeted database categories, and specialized labor requirements will ensure your estimates are accurate, safe, and fully compliant with industry standards.